A tile takeoff turns a set of PDF drawings into the quantities a tile contractor needs to price and order a job: floor tile area, wall tile area, trim and edge lengths, and the number of boxes to buy once waste is added. Get it wrong and you either run short halfway through a shower wall or leave a pallet of tile in the client's garage.
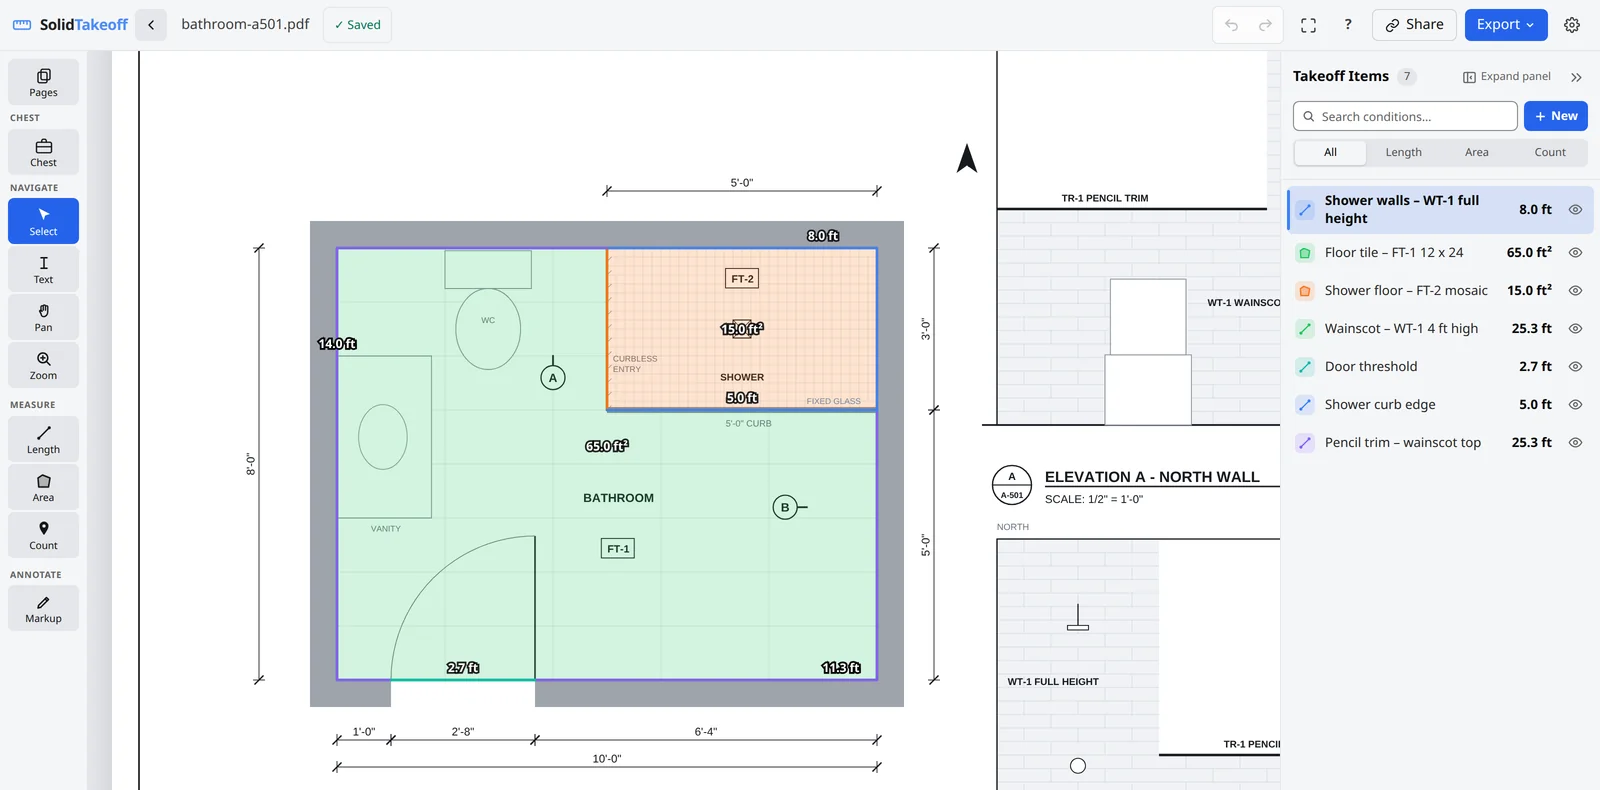
This guide shows how to do a tile takeoff from PDF drawings step by step, using one bathroom as a worked example from start to finish. It covers floors and walls, trims, waste and box quantities, and how to hand the numbers to a spreadsheet for pricing. The method works with any measuring tool; the screenshots use SolidTakeoff, a browser-based takeoff tool.
What Is a Tile Takeoff?
A tile takeoff is the measured quantity of every tiled surface and tile accessory on a project, taken from the plans, elevations and finish schedule. It sits between reading the drawings and building the estimate.
It helps to keep two numbers apart:
- Measured quantity: the net area or length you measure on the drawings, for example 65 sq ft of floor tile.
- Order quantity: the measured quantity plus waste, rounded up to whole boxes, sheets or lengths, for example 5 boxes.
Measured quantities should be traceable back to the drawing. Order quantities depend on the tile format, the layout pattern and the supplier's packaging. Mixing the two in one cell is how errors creep into bids. If you already price floors, our flooring takeoff guide covers the floor side in more depth; a tile takeoff adds wall tiling, trims, tile formats and box quantities.
What You Need Before Starting a Tile Takeoff
Collect these before you measure anything:
- Floor plans for room layouts, shower and tub locations, and fixed joinery such as vanities.
- Interior elevations for wall tile heights, wainscot lines, niches and feature walls.
- Finish schedule with tile codes, sizes, finishes and which rooms get which tile.
- Specifications for substrate, waterproofing, setting materials, grout type and movement joints.
- Details for shower curbs, thresholds, niches and trim profiles.
- The latest revision of each sheet, with addenda and revision clouds checked.
Write down your scope before you start: does your price include waterproofing, backer board, trims and sealant, or only tile and setting materials? A precise takeoff of the wrong scope is still a wrong bid.
Step 1: Upload Your PDF Drawings and Verify Scale
Upload the plans and elevations, then set the scale on each sheet. Do not trust the printed scale alone: PDFs are often resized, cropped or "printed to fit". Calibrate against a long dimension you can trust, then check a second dimension. If the second one is off, recalibrate before measuring. Our guide on how to verify the PDF scale explains the checks in detail.
Watch for sheets with mixed scales. Plans are often 1/4" = 1'-0" while enlarged bathroom plans and elevations are 1/2" = 1'-0" (or 1:50 and 1:20 on metric drawings). Each viewport needs the right scale.
Step 2: Measure Floor Tile Areas
Trace each floor tile area as a separate area measurement, grouped by tile code rather than by room name. If the main floor tile and the shower floor mosaic are different products, they need different conditions (named takeoff items), even in the same room.
Practical rules:
- Measure to the finished wall line shown on the plan, and follow the finish schedule for whether tile runs under vanities and built-in cabinets.
- Deduct areas that will not be tiled, such as a tub footprint or a shower pan that gets a different finish.
- Keep thresholds and transitions as separate linear items so they are not lost in the area total.
To measure floor area from a PDF plan, click around the boundary of each area; the tool totals square feet (or m²) for each condition.
Step 3: Calculate Wall Tile Quantities
Wall tile is where most tile takeoffs go wrong, because the height lives on the elevations while the wall length lives on the plan.
The reliable method is wall length x tile height:
- Measure the run of wall that gets tile on the plan, as a linear measurement.
- Take the tile height from the elevation: full height in a shower, wainscot height elsewhere, or from tub rim to ceiling.
- Multiply to get wall area, then deduct doors, windows and other openings inside the tiled zone.
- Add back extra surfaces such as niche backs and returns, window reveals and shower curbs.
In SolidTakeoff you can enter a height on a linear condition and it reports the wall area from that run, so the length on the plan and the area on the wall stay linked if either changes.
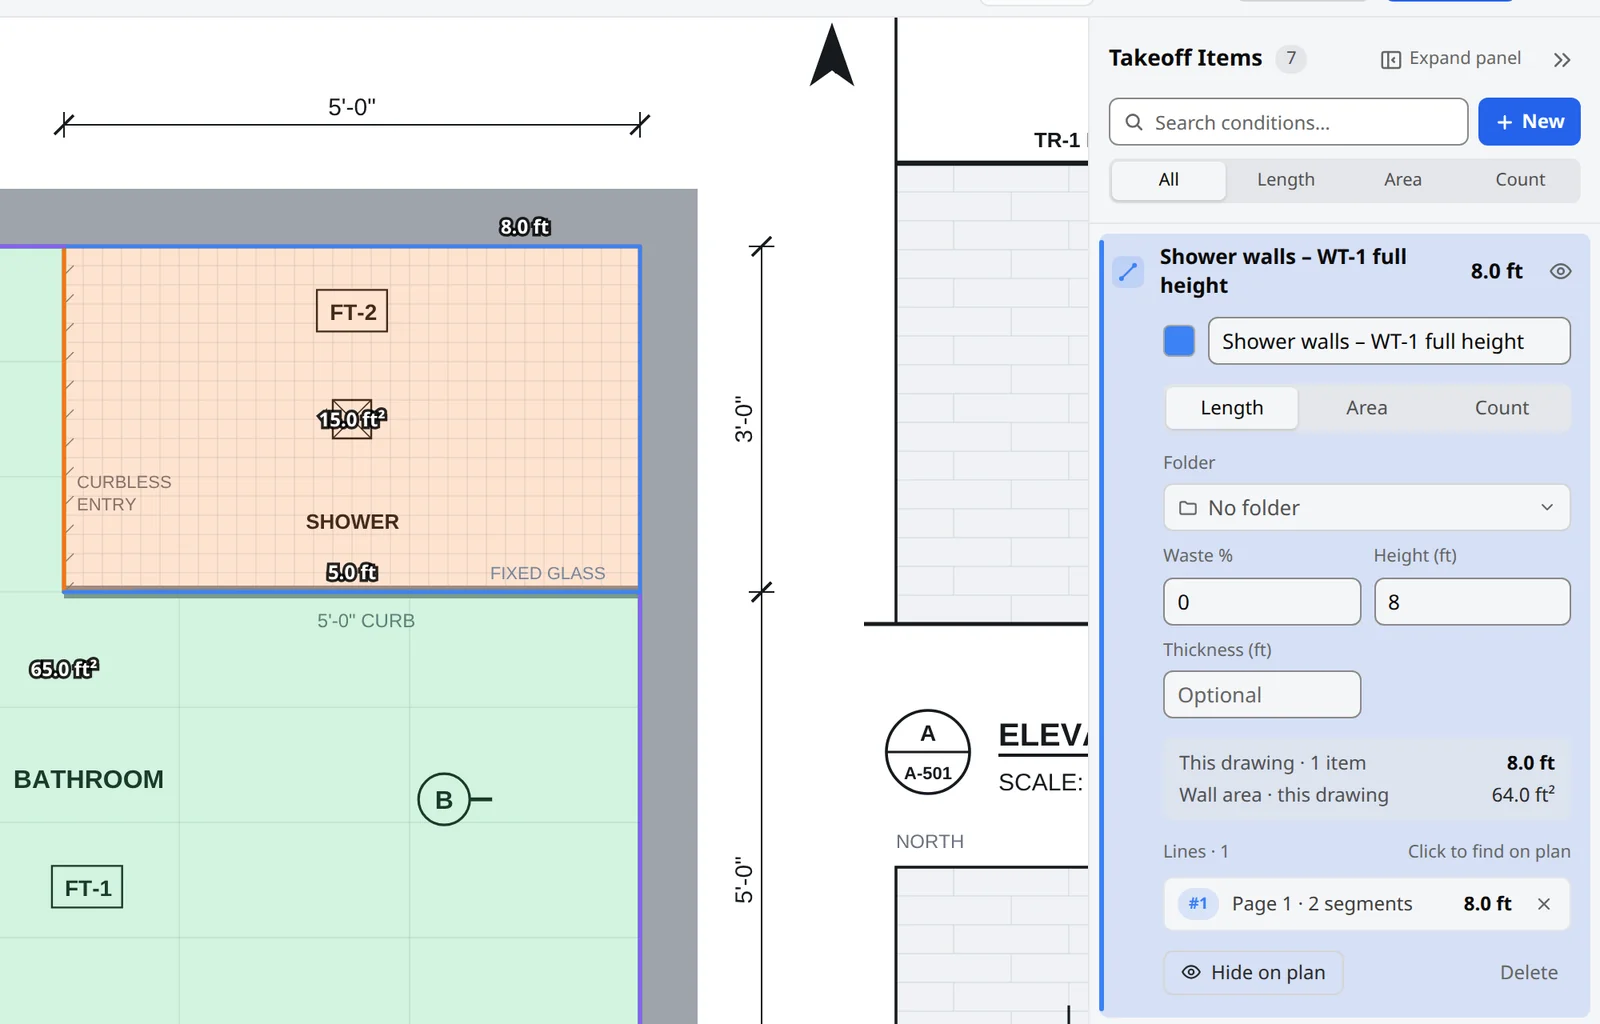
Keep different wall tiles in different conditions, for example shower walls in one tile and the wainscot in another, so each one prices and orders separately.
Step 4: Measure Tile Trims, Edges and Skirting
Trims are bought by the length, so measure them as linear quantities in linear feet (or linear metres):
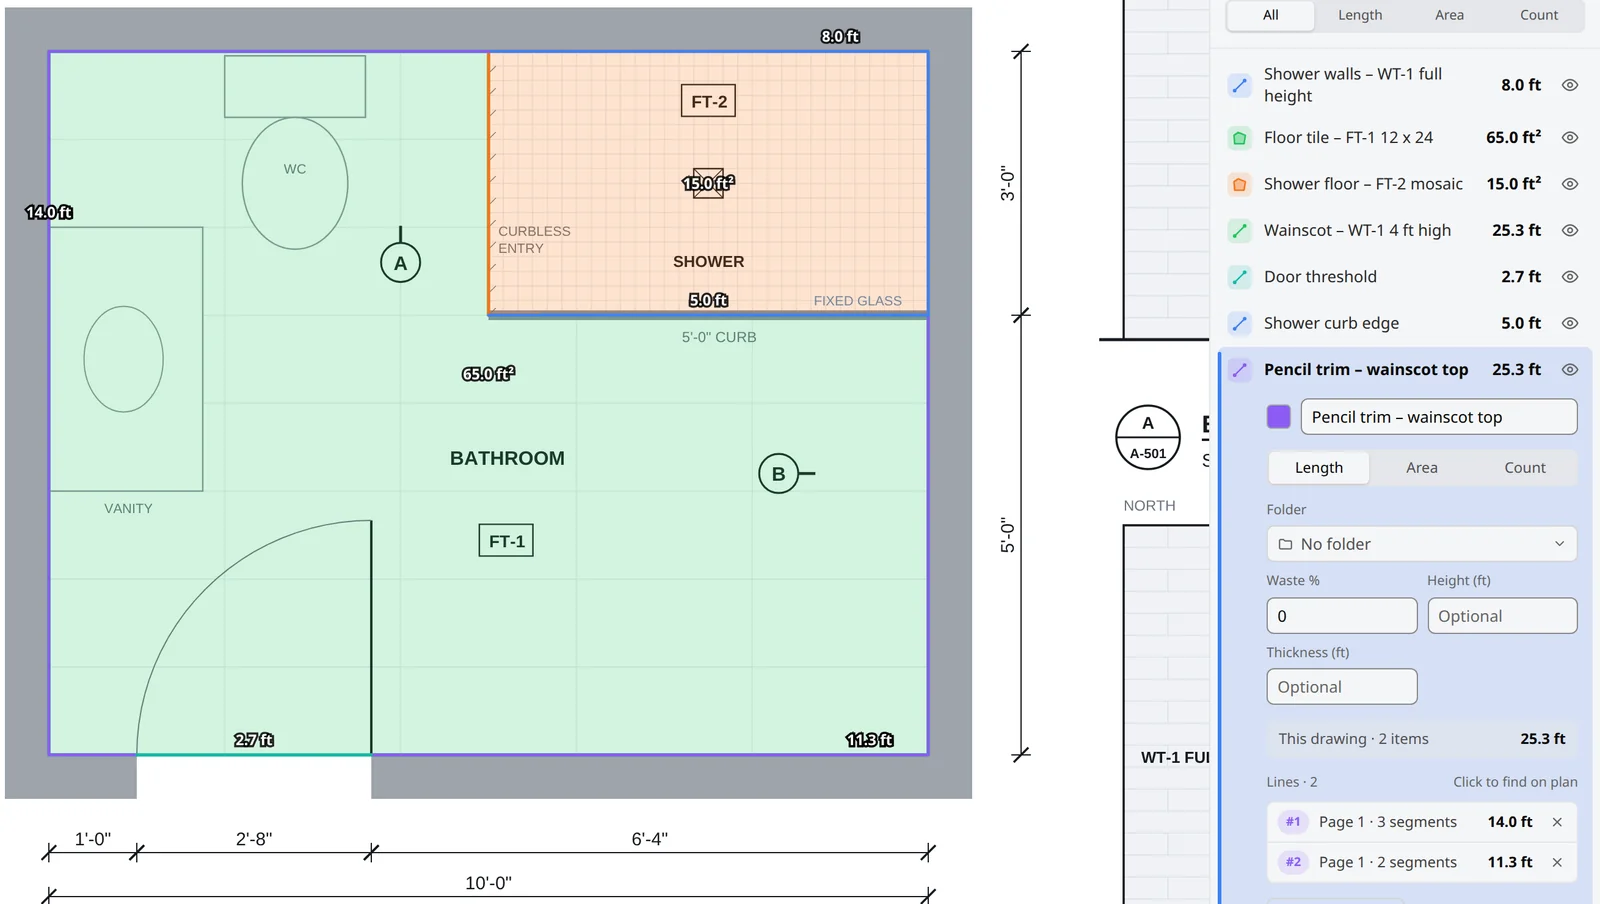
- Top edges of wainscots and partial-height walls (bullnose, pencil or metal trim).
- External corners and exposed vertical edges where tile stops.
- Tile base or skirting where the floor tile turns up the wall.
- Thresholds and transitions at doorways.
- Shower curbs and niche edges.
Give each trim profile its own condition. When you later divide by the trim's stock length, you need the length per profile, not one combined figure.
Step 5: Calculate Tile Waste and Boxes Required
Waste covers cuts, breakage and pattern loss. There is no single correct percentage. A straight-lay floor in large rooms needs far less allowance than a herringbone pattern or a small bathroom full of cuts. Base the allowance on the tile format, the layout, the room shapes and the manufacturer's or installer's guidance, and write it down as an assumption.
Then convert to boxes:
- Measured area x (1 + waste allowance) = area to order.
- Area to order / coverage per box (from the supplier's carton or data sheet) = boxes.
- Round up to whole boxes, and check whether the supplier sells part pallets or requires full ones.
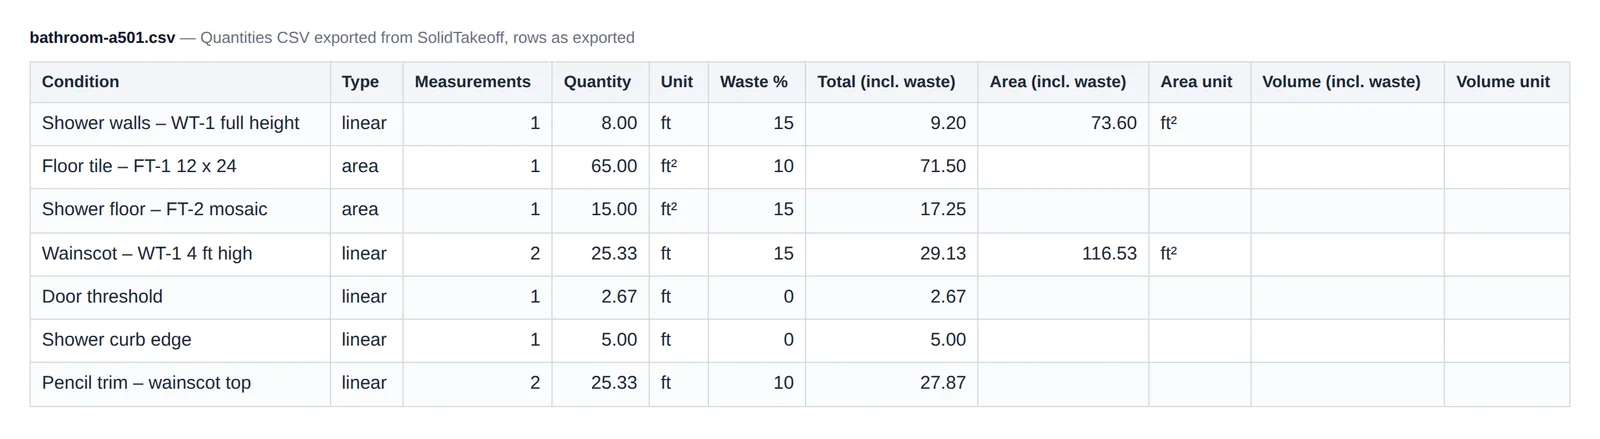
Keep the waste figure on the condition, not baked into the measurement. SolidTakeoff lets you set a waste % on each condition so the measured and adjusted totals sit side by side.
Two more checks before you order: buy the whole quantity from one production lot so the shade matches, and confirm with the client whether they want spare tile left over for future repairs.
Step 6: Allow for Adhesive, Grout and Waterproofing
Setting materials follow from the areas you have measured, but the quantities come from the products, not from the drawing:
- Thinset or adhesive: coverage depends on the trowel notch and tile size; use the manufacturer's coverage chart.
- Grout: depends on tile size, thickness and joint width; manufacturers publish calculators for this.
- Waterproofing membrane: shower floors and walls to the height the specification requires, plus any other wet areas.
- Backer board or substrate: usually the same wall areas as the tile, by the sheet.
- Movement joints and sealant: by the linear foot at perimeters, changes of plane and as the specification requires.
A takeoff tool gives you the areas and lengths these depend on. The conversion to bags, buckets and rolls belongs in your spreadsheet, using the supplier's figures.
Step 7: Export Your Tile Takeoff to Excel
Once every condition is measured, export the quantities. SolidTakeoff exports an annotated PDF of the marked-up drawings and a CSV of each condition with its quantity and unit, which opens in Excel or Google Sheets. In the spreadsheet:
- List each condition with its measured quantity and waste allowance.
- Calculate boxes, sheets and trim lengths from the supplier's coverage and stock lengths.
- Add setting materials, labor, and any prep or demolition.
- Keep the annotated PDF with the estimate, so anyone can check where each number came from.
Before the bid goes out, run through the construction takeoff checklist to catch missed rooms, scales and revisions.
Worked Example: Complete Bathroom Tile Takeoff
Here is one bathroom taken off end to end. The dimensions and the box and waste figures below are illustrative assumptions for the example, not standard values; always use your drawings and your supplier's data.
The room (from the plan and elevations): an 8 ft x 10 ft bathroom with a 3 ft x 5 ft walk-in shower in one corner (two tiled room walls, a glass panel and a curb on the open sides), a 2 ft 8 in door, and no window. The finish schedule calls for 12 x 24 in porcelain on the main floor, 2 x 2 in mosaic on the shower floor, 3 x 12 in wall tile full height (8 ft) in the shower, and a 4 ft wainscot on the remaining walls, finished with a pencil trim.
The shower has two tiled room walls measuring 3 ft and 5 ft. A 5 ft curb runs along one open side; the remaining 3 ft opening is curbless. The stated 3 x 5 ft shower floor area is measured within the finished tile boundaries.
For this simplified example, the main floor and shower floor are separate finishes. The full-height shower walls replace the wainscot on those two wall runs. The door is outside the shower. Shower curb faces, niche returns and other additional tiled surfaces must be measured separately where detailed.
Floor tile (12 x 24 in porcelain)
- Room area: 8 x 10 = 80 sq ft
- Less shower floor: 3 x 5 = 15 sq ft
- Measured: 65 sq ft
Shower floor (2 x 2 in mosaic)
- Measured: 15 sq ft
Shower walls (3 x 12 in, full height)
- Tiled wall length: 3 ft + 5 ft = 8 ft
- Height: 8 ft
- Measured: 64 sq ft
Wainscot (3 x 12 in, 4 ft high)
- Room perimeter: 2 x (8 + 10) = 36 ft
- Less shower walls (8 ft) and door (2.67 ft): 25.33 ft
- Height: 4 ft
- Measured: 101.3 sq ft
Trims and edges
- Pencil trim on top of the wainscot: 25.3 LF
- Exposed vertical edges where the full-height shower tile stops above the 4 ft wainscot (transitions above the wainscot only): 2 x 4 ft = 8 LF
- Shower curb edge: 5 LF (curb faces, top and returns are measured separately once the curb detail is confirmed)
- Door threshold: 2.67 LF
From measured quantities to an order (example assumptions)
This example assumes the shower and wainscot use the same 3 x 12 in tile, so their areas are combined for purchasing. If the finishes, colours or production batches differ, calculate their orders separately. The waste allowances, carton coverage and whole-unit rounding below are illustrative only; use your supplier's data and your installer's allowance for the actual tile and layout.
| Item | Measured | Illustrative waste allowance | To order | Illustrative coverage | Order (whole units) |
|---|---|---|---|---|---|
| Floor tile 12 x 24 in | 65 sq ft | 10% | 71.5 sq ft | 15.5 sq ft per box | 5 boxes |
| Shower mosaic 2 x 2 in | 15 sq ft | 15% | 17.3 sq ft | 1 sq ft per sheet | 18 sheets |
| Wall tile 3 x 12 in (shower + wainscot) | 165.3 sq ft | 15% | 190.1 sq ft | 10 sq ft per box | 20 boxes |
| Pencil trim | 25.3 LF | 10% | 27.9 LF | 1 ft pieces | 28 pieces |
In a real takeoff, each measured quantity should be traceable to the current drawings. In this illustrative example, the quantities follow the stated room dimensions and scope assumptions. Waste, box coverage and purchasing quantities remain separate calculations, so you can change them when a supplier's carton size or the client's layout choice changes.
Common Tile Takeoff Mistakes
- Wrong wall heights. Taking the height from the plan note instead of the elevation, or missing that a shower is full height while the rest is wainscot.
- Forgetting deductions, or over-deducting. Doors and windows inside the tiled zone come out; small openings often are not worth deducting because the cuts cost tile anyway.
- Missing extra surfaces. Niche backs and returns, window reveals, curbs and benches all take tile.
- Lumping tiles together. Two products in one condition cannot be ordered correctly.
- Leaving out trims. Edges, corners and thresholds are small quantities but common omissions.
- Using one waste figure for everything. Large straight-lay floors and small, cut-heavy walls behave very differently.
- Measuring an old revision. Finish schedules change late; check revision clouds before ordering.
Tile Takeoffs for Australian Contractors
The method is the same in Australia, with a few differences in practice:
- Units: measure tile in square metres (m²) and trims and skirting in linear metres. Drawings are usually 1:100 plans with 1:50 or 1:20 wet-area plans and elevations, so check the scale on each viewport.
- Substrates: wall tile often goes on wet-area plasterboard or fibre cement sheet, and the sheet quantity follows the same wall areas; see our plasterboard takeoff guide.
- Waterproofing: wet-area waterproofing requirements are set by the applicable standards and state rules, so take the membrane extent from the specification and details rather than assuming it.
- Tenders: many tenders ask for quantities against a bill of quantities or trade breakdown. Keeping each tile, trim and accessory as a separate condition makes it easy to match those line items.
For reference, the example bathroom's 65 sq ft of floor tile is about 6.0 m², and its 165.3 sq ft of wall tile is about 15.4 m².
Frequently Asked Questions
How do you calculate tile quantities from plans? Measure the net floor area of each tile type on the plan, measure wall lengths on the plan and multiply by tile heights from the elevations, deduct openings, then add a waste allowance and divide by the coverage per box. Round up to whole boxes.
How much waste should I add for tile? It depends on the tile size, the layout pattern and how many cuts the room needs. Use the manufacturer's or installer's guidance for the specific tile and layout, and record the allowance as an assumption in your estimate rather than using one figure for every job.
Is a tile square footage calculator enough? A calculator is fine for a single simple room. For a full set of plans with several tile types, wall heights and trims, measuring directly on the PDF keeps every quantity tied to the drawing so it can be checked and updated when revisions arrive.
Should I measure from plans or on site? Take the takeoff from the plans for the bid, then verify critical dimensions on site before ordering, especially in renovations where walls are rarely square.
Is there free tile takeoff software? SolidTakeoff has a free plan with all measurement tools, including area, length, count and waste % on conditions, for 1 active project and 3 drawing uploads in total. Solo is $12.99 per month for unlimited projects and clean exports, and Team is $49.99 per month for 3 users, then $16.99 per extra user. See plans and pricing. It is a takeoff (measurement) tool rather than full tile estimating software: pricing, setting materials and box counts are calculated in your spreadsheet from the exported quantities.
Measure Your Next Tile Job from the PDF
Measure tile quantities directly from your PDF drawings. Use SolidTakeoff to calculate floor and wall areas, measure trim lengths and export your quantities to Excel. Start free — no credit card required.
New to takeoff? Start with our guide to doing a construction takeoff from PDF plans.