If you need to price a job from drawings, you first need quantities. Learning how to do a construction takeoff is the skill that turns a set of blueprints into linear feet of wall, square footage of flooring, and counts of fixtures you can actually bid. The same process works with metric drawings used in Australia and other markets. We'll cover both unit systems, including how takeoff quantities can feed a bill of quantities (BOQ).
This 2026 guide walks through a practical construction takeoff from PDF workflow: verify scale, measure lengths, areas and counts, organize by trade, add waste, then export. You can do the whole process in a browser with PDF takeoff software — no AutoCAD seat required. For a shorter beginner walkthrough, see our guide on how to do a takeoff from a PDF.
Quick answer: to do a construction takeoff from PDF drawings, (1) open the latest plan set and verify the scale on every sheet against a known dimension, (2) measure linear feet, square footage and counts into named conditions, (3) group the quantities by trade and material, (4) check coverage and counts against the schedules and add waste per condition, then (5) export an annotated PDF and a CSV for your estimate.
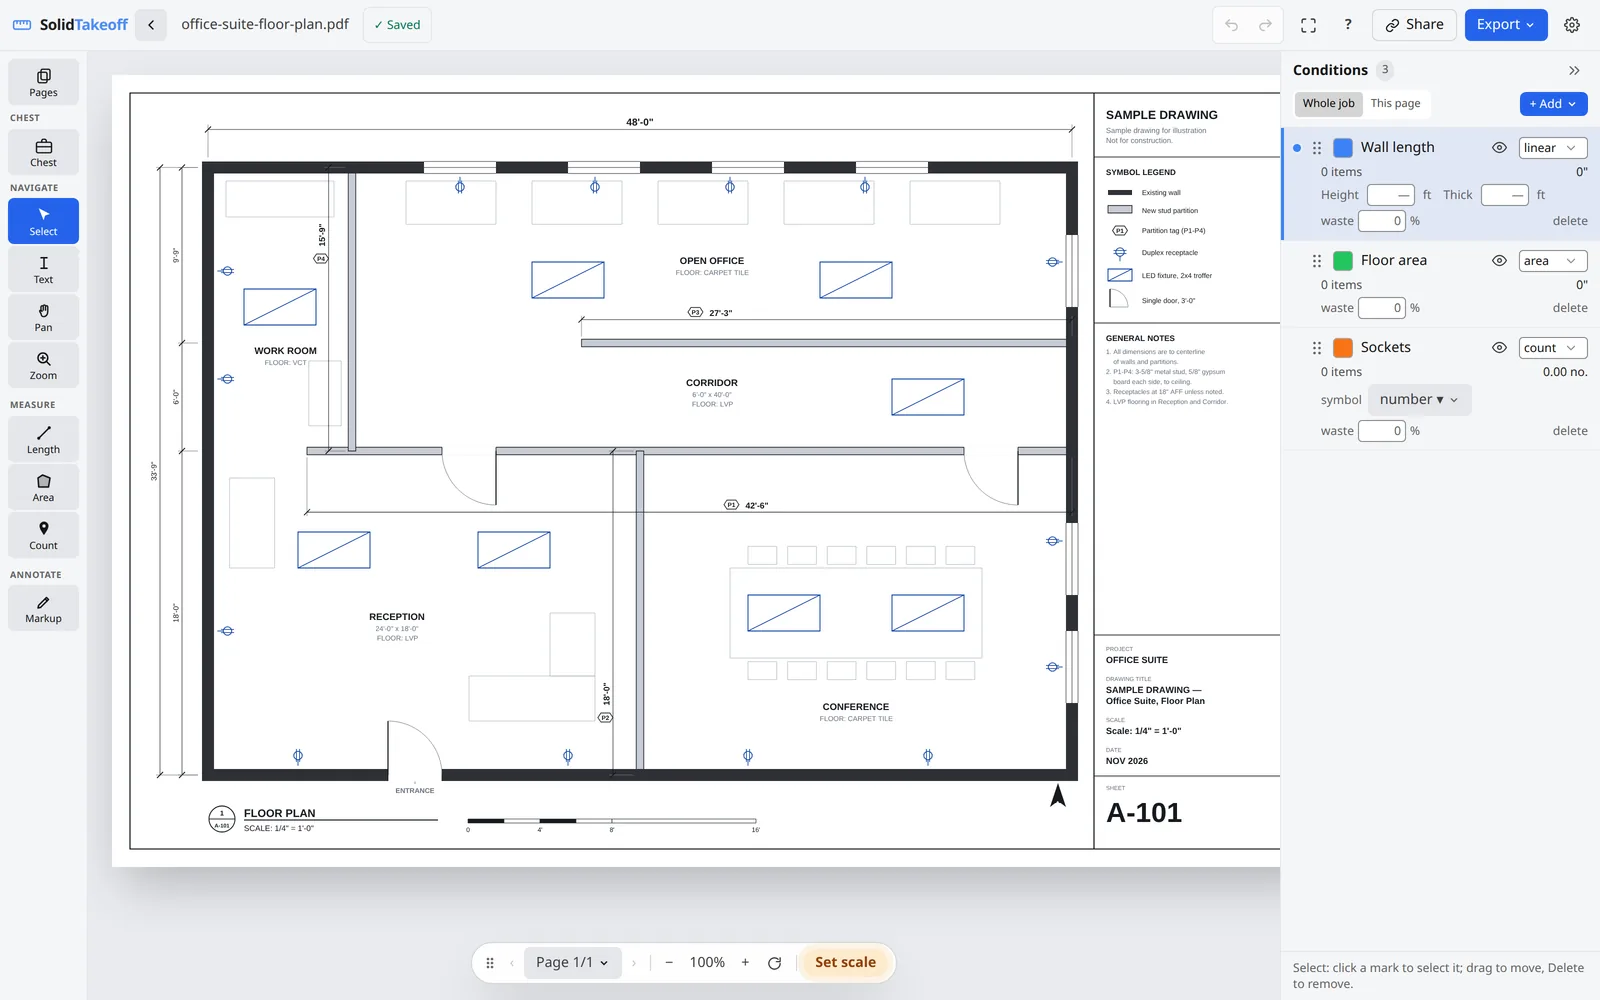
Every screenshot below comes from one sample drawing — a small office suite at 1/4" = 1'-0" — measured in SolidTakeoff, so you can follow the same numbers from start to finish.
What Is a Construction Takeoff?
A construction takeoff (also called a quantity takeoff or construction material takeoff) is the process of measuring everything you will buy and install from the drawings. Estimators extract:
- Linear feet (LF) — walls, base, railing, conduit, curb
- Square footage (SF / sq ft) — floors, drywall faces, roof planes, paint
- Counts — doors, windows, outlets, lights, fixtures
- Sometimes volume — concrete, excavation, insulation fill (often calculated from measured dimensions rather than a dedicated volume tool)
A digital construction takeoff does this on a PDF (or a photo/scan) instead of printing sheets and using a scale ruler. You set the drawing scale once per sheet, then click or trace quantities into named buckets. That is faster to review, easier to revise when drawings change, and cleaner to hand to a spreadsheet.
Quantity Takeoff vs. Material Takeoff vs. Cost Estimate
The three terms get used loosely, but they are different steps:
| What it is | Example from our sample plan | |
|---|---|---|
| Quantity takeoff | The measured quantities, straight from the drawings | 103'-6" of partition; 672 sq ft of floor; 14 receptacles |
| Material takeoff | Those quantities turned into things to order, with waste and pack sizes | 672 sq ft + 7% waste ≈ 719 sq ft of LVP, rounded up to whole cartons |
| Cost estimate | Materials and labor priced, plus markup and risk | 719 sq ft × your installed rate per sq ft, plus overheads |
The takeoff is not the estimate. Get the takeoff wrong and every price that follows is wrong.
What You Need Before Starting a Takeoff
Before you measure, assemble a small checklist so you are not guessing mid-job:
- The latest PDF plan set — confirm revision numbers and dates. Do not take off an outdated issue.
- Specs and schedules — door schedules, finish schedules and notes often define what "each" means.
- Units — US projects usually want feet/inches for length and sq ft for area. Match the bid form.
- A scale strategy — architectural scales such as 1/4" = 1'-0" are common on floor plans; civil and site sheets often use engineering scales. Expect mixed scales across a set.
- A takeoff tool — paper and a scale rule still work, but PDF takeoff software keeps live totals, waste % and exports ready for Excel.
- Naming conventions — decide how you will name conditions (for example "Partitions — stud line", "Flooring — LVP", "Receptacles — duplex") so the export is bid-ready.
Optional but useful: a second known dimension on each sheet for scale verification, and a list of openings or exclusions the bid documents require.
If the set includes details and elevations, skim them before measuring floor plans. Heights, both-sides board notes and finish transitions often live there, not on the plan view you will click first.
Step 1: Upload Your PDF Drawings and Verify the Scale
Scale is the foundation of every accurate takeoff. If scale is wrong, every linear foot and every square foot is wrong.
Upload the drawings
Open your PDF plan set (or a photo/scan of a sheet). Work sheet by sheet. Multi-page PDFs often mix scales, so treat each page as its own calibration problem.
Confirm the stated scale
Read the title block. Architectural floor plans often show 1/4" = 1'-0", 1/8" = 1'-0" or similar. Do not trust the label alone — PDFs get resized, printed and scanned, which can break a ratio preset.
Use AI scale detection as a suggestion — then verify
Some tools can read a scale bar, a labelled dimension or a title-block ratio and propose a scale with a confidence level. Treat that as a suggestion, not a finished decision. Confirm it yourself before measuring. In SolidTakeoff, ✨ Detect does this for signed-in users on every plan, including Free: it proposes a scale and you confirm it before it's applied.
Calibrate manually when needed
If the PDF is not at true paper size, or the sheet is a scan:
- Find a long, clear labelled dimension (overall building length, a grid bay or a known wall).
- Draw between the two endpoints of that dimension.
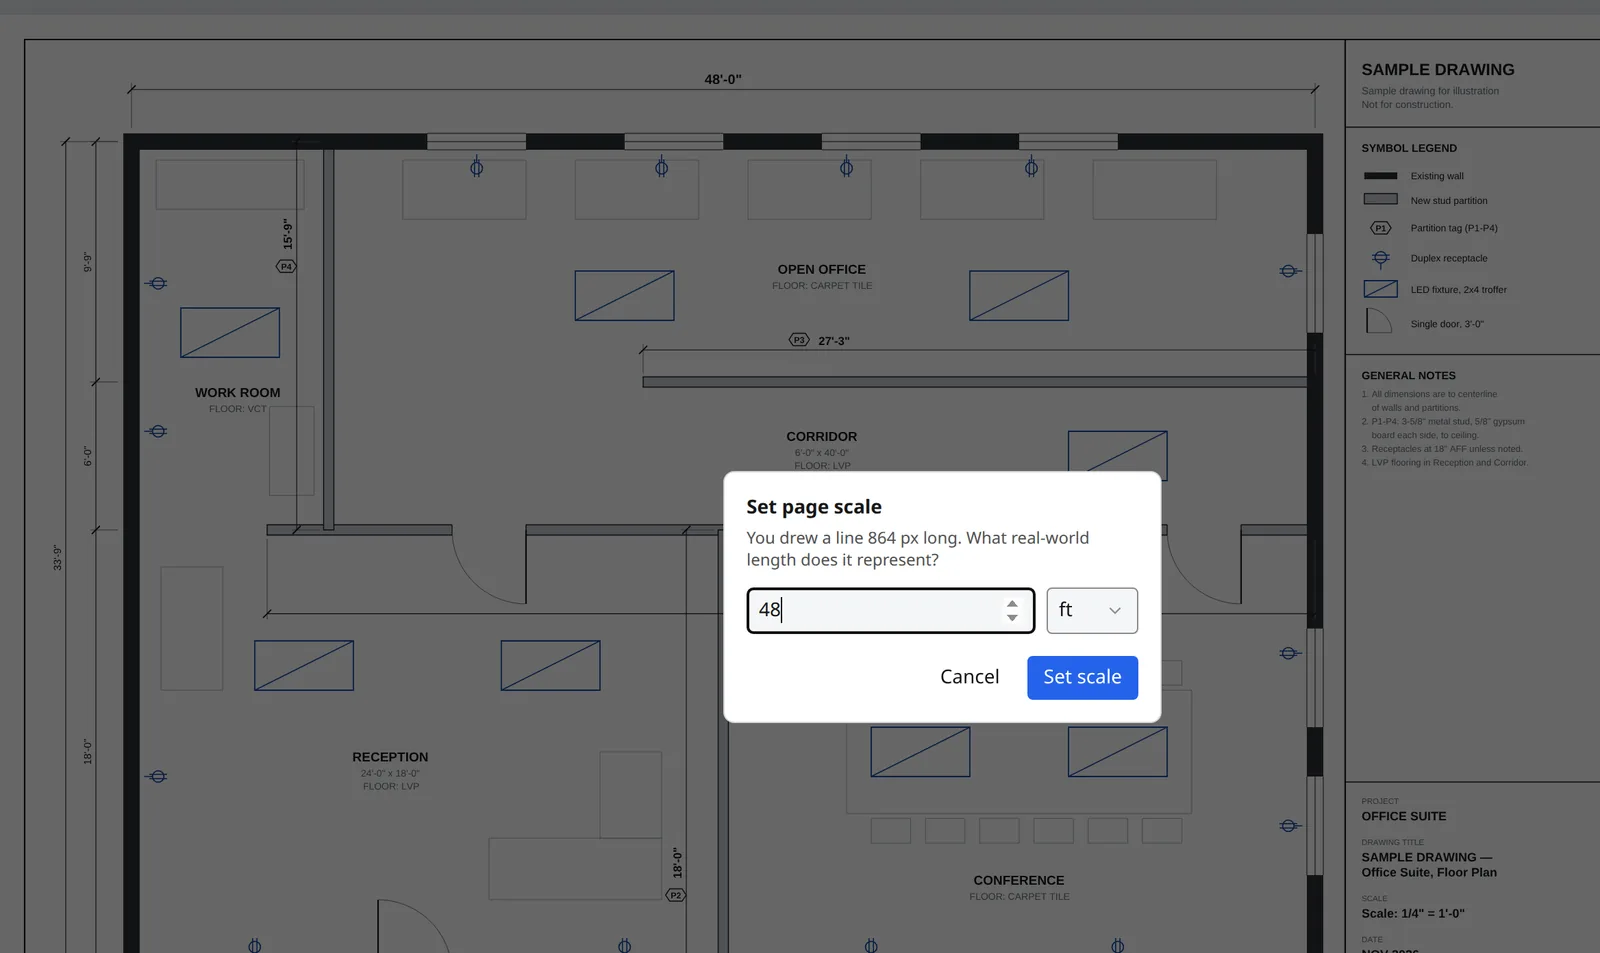
- Enter the real length. On our sample plan, that is the overall 48'-0" dimension.
- Measure a second dimension elsewhere — ideally in a different direction — and confirm it matches the drawing.
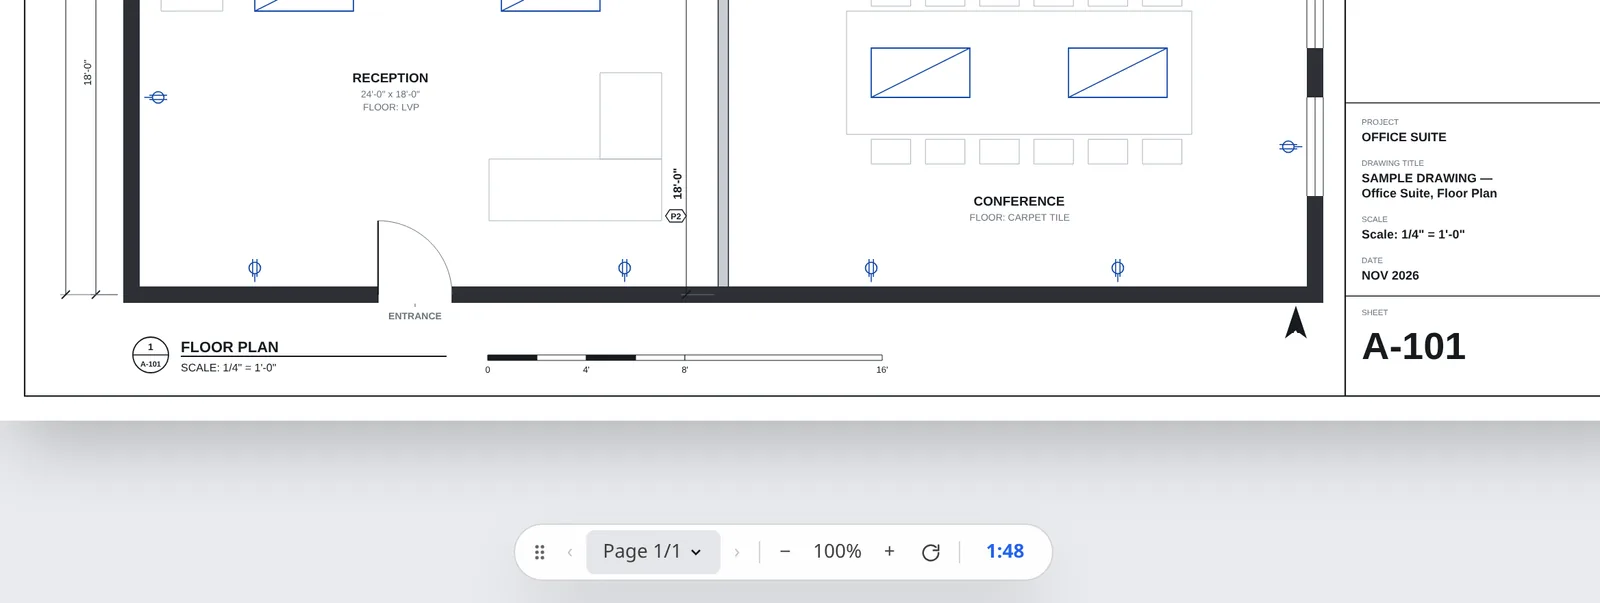
On the sample plan, the line across the 48'-0" dimension sets the page to 1:48, which is the ratio form of 1/4" = 1'-0" and matches the title block.
That manual calibration is the reliable path for scanned plans and phone photos. For more on reading and checking scales, see how to set the scale on a scanned plan and how to scale a PDF drawing accurately.
Step 2: Measure Linear Feet, Square Footage and Counts
Once scale is verified, measure in three basic modes: linear, area and count. Keep related measurements in named conditions so totals stay organized.
Linear feet (walls and runs)
Use the linear tool to trace wall centerlines or the face you price. Click along each run, follow corners carefully, and finish the path. The length updates as you draw.
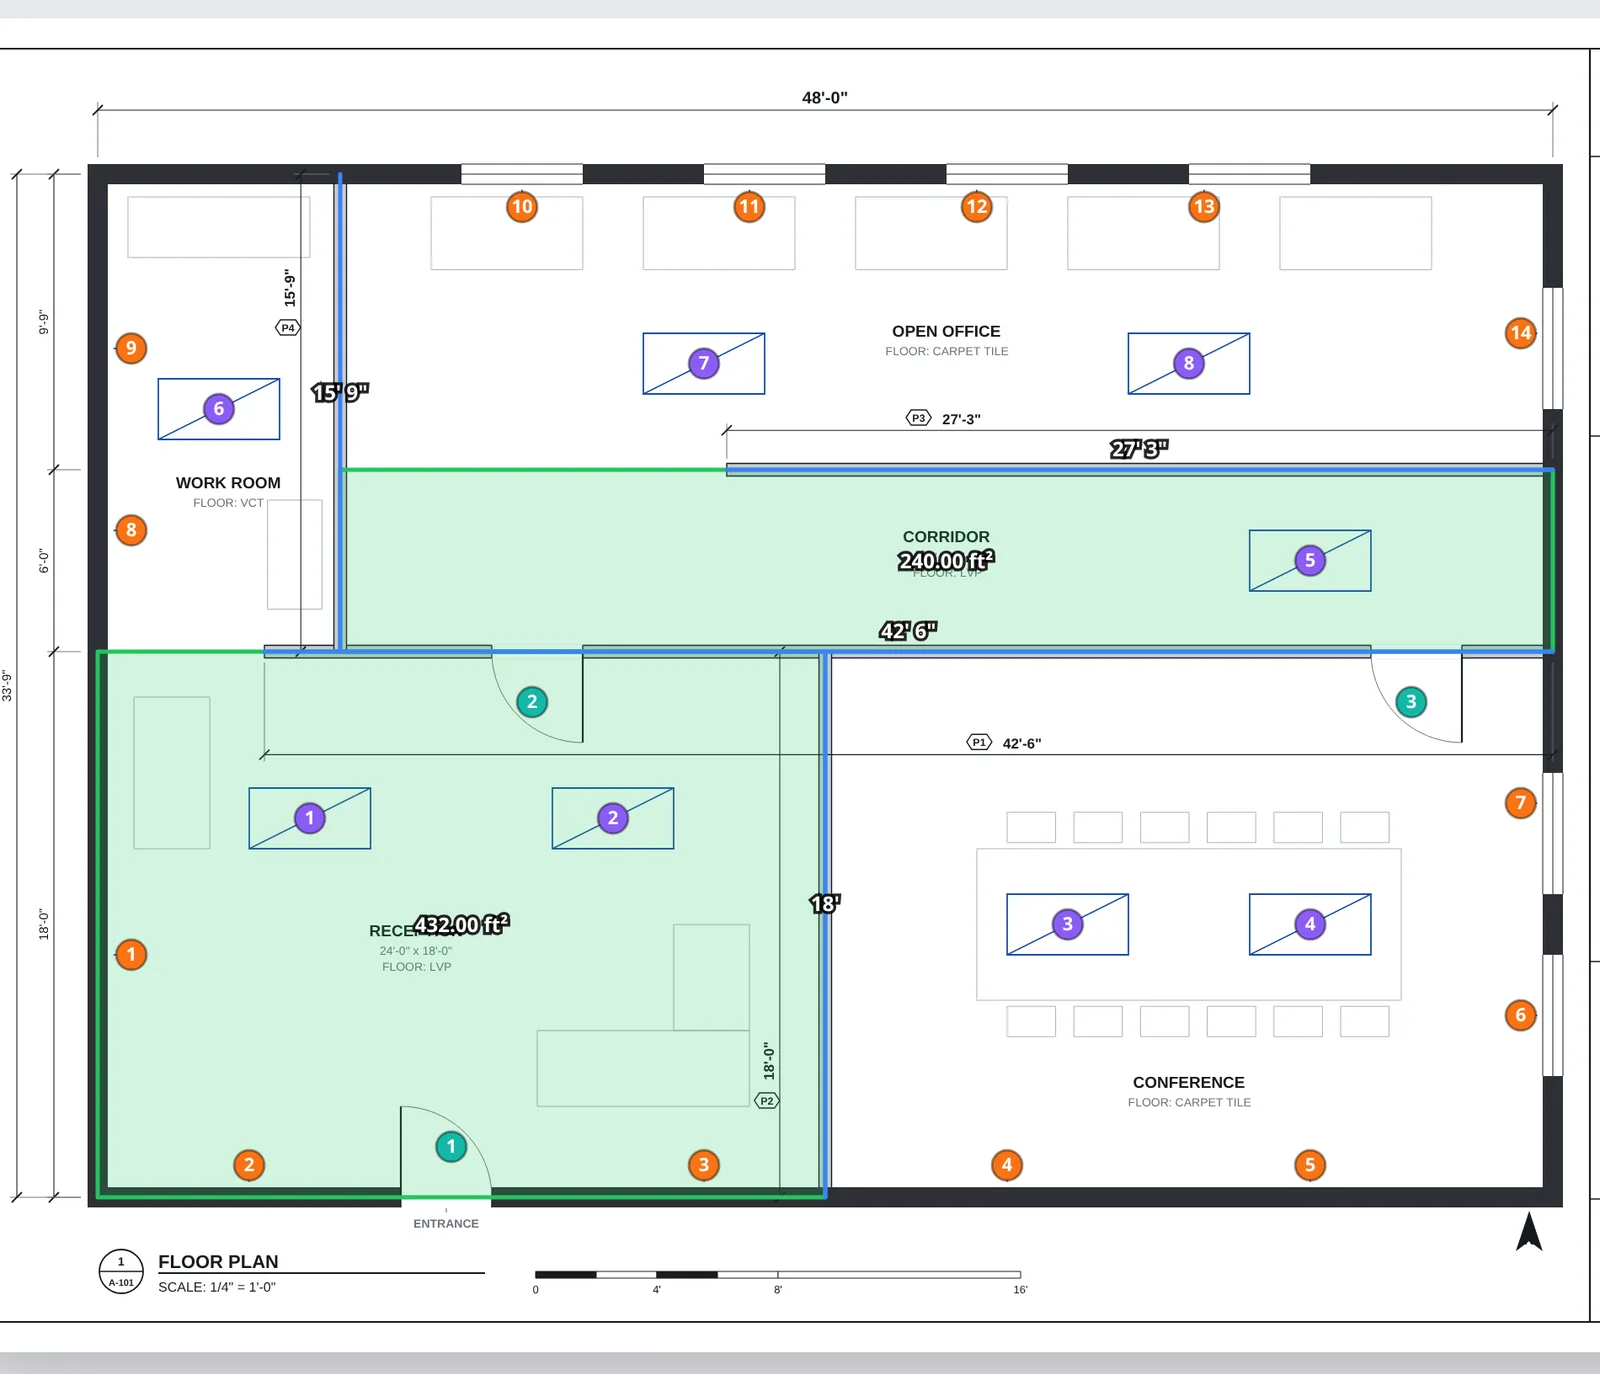
Worked example — walls: the sample suite has four partition runs of 42'-6", 18'-0", 27'-3" and 15'-9". Sum = 103'-6" (103.5 LF) of partition. That lineal total feeds track, studs and (with a height) drywall area. For a drywall-focused method, see how to measure drywall from a PDF.
Square footage (floors and surfaces)
Use the area tool to outline rooms or finishes. Close the polygon and read sq ft at scale. Deduct large openings only when your bid rules require it.
Worked example — flooring: the reception area measures 24'-0" × 18'-0" = 432 sq ft. The corridor measures 6'-0" × 40'-0" = 240 sq ft. Combined LVP flooring = 672 sq ft before waste.
Counts (fixtures and openings)
Drop numbered markers for each fixture type: duplex outlets, lights, doors, lavatories. Numbered markers make it easy to cross-check against schedules.
Worked example — fixtures: the same suite shows 14 duplex receptacles, 8 LED fixtures and 3 doors. Create separate count conditions so electrical and openings do not blend into one meaningless total.
As you measure, keep a simple habit: finish one condition type before jumping to another when the sheet is dense. Many estimators take all partition linears first, then floors, then counts. That reduces missed walls and double-counted rooms. Zoom in at corners and door jambs so your clicks land on the line you intend to price.
Step 3: Organize Quantities by Trade and Material
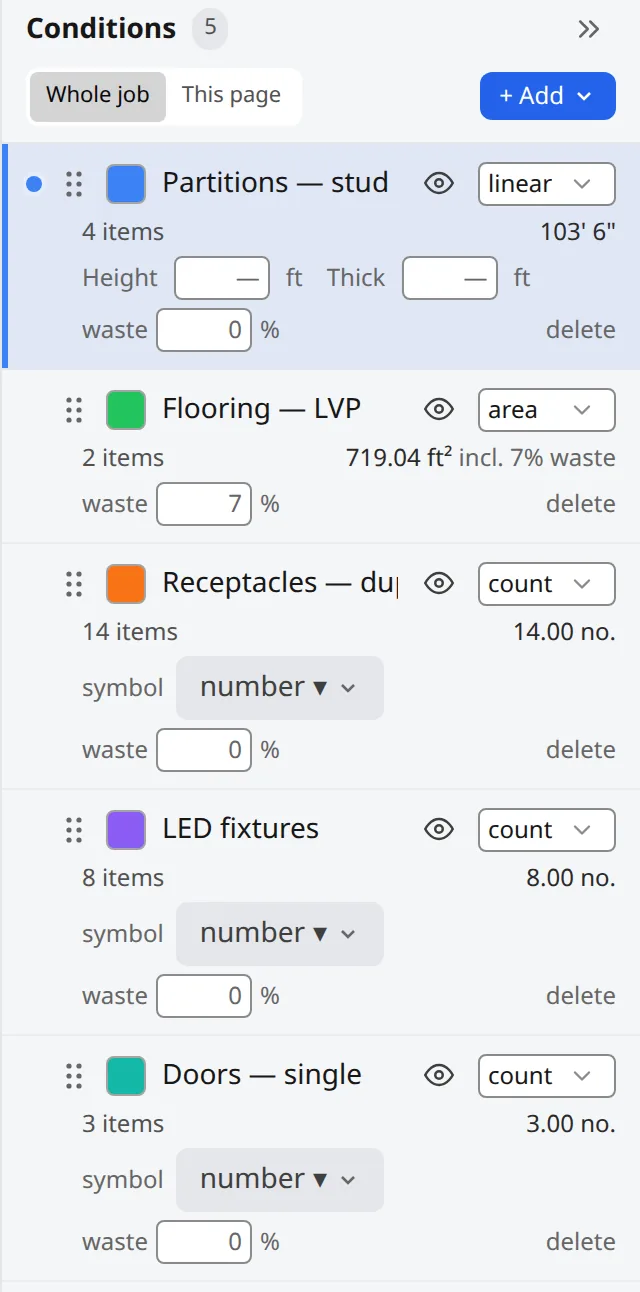
A useful takeoff is not a pile of anonymous numbers. Group measurements into conditions that match how you buy and bid. Here is how the sample plan breaks down:
| Condition | Type | Quantity |
|---|---|---|
| Partitions — stud line | Linear | 103' 6" (103.5 LF) |
| Flooring — LVP | Area | 672.00 sq ft measured; 719.04 sq ft including 7% waste |
| Receptacles — duplex | Count | 14 |
| LED fixtures | Count | 8 |
| Doors — single | Count | 3 |
Keep separate conditions when unit prices differ (fire-rated vs standard drywall, moisture board vs regular board, different flooring types). Color-code conditions so overlapping work stays readable on busy plans.
If your tool supports waste % per condition, set it here rather than padding numbers by hand — raw measured totals stay honest, and the with-waste figure is transparent.
Step 4: Check Measurements and Account for Waste
Before you export, run a short quality check:
- Rescale check — remeasure one known dimension. If it drifted, stop and recalibrate.
- Coverage check — scan the sheet for rooms, walls or symbols you skipped.
- Schedule reconciliation — door and fixture counts should match schedules (or you should document the variance).
- Revision check — confirm you measured the revision you intend to bid.
- Assumptions — note heights, both-sides drywall rules, opening deductions and anything the drawings leave unclear.
Waste allowances
Waste covers cutting, breakage and pattern matching. Typical ranges vary by trade, material and layout, so use your company standards or supplier guidance. Apply waste as a percentage on the condition so the export shows measured and adjusted quantities side by side. The figures here — 7% on flooring and 10% on drywall board — are illustrative examples, not recommendations for your job.
Example: 672 sq ft of flooring × 1.07 = 719.04 sq ft with 7% waste — round up to whole cartons per the product's pack size.
Step 5: Export Your Takeoff to PDF or Excel
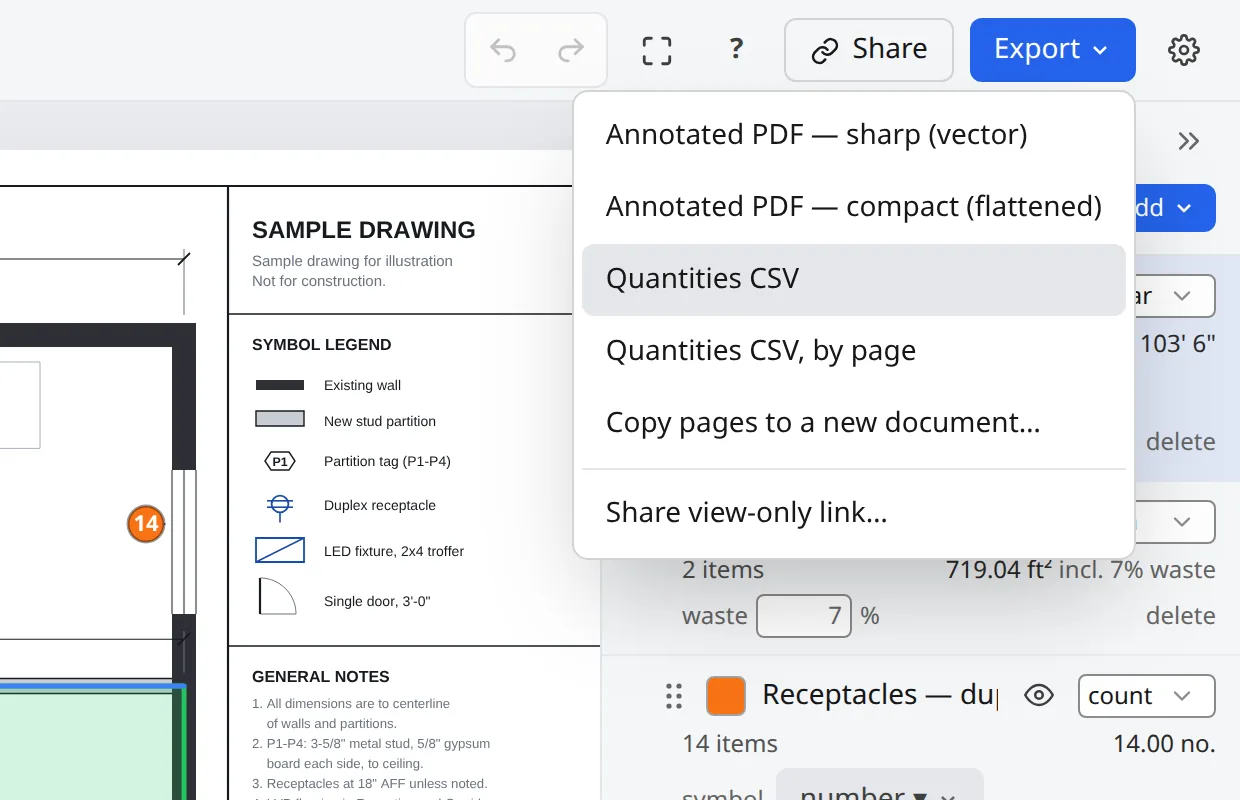
When measurements are checked, export the two deliverables most estimators need:
- Annotated PDF — the drawing with measurements and a quantity summary, useful for review and client questions
- CSV — opens in Excel or Google Sheets and drops into your estimate template
A CSV of lengths, areas and counts per condition is usually the fastest path into pricing. If your workflow is spreadsheet-heavy, that export is the finish line of the takeoff. Step-by-step: how to export a takeoff to Excel.
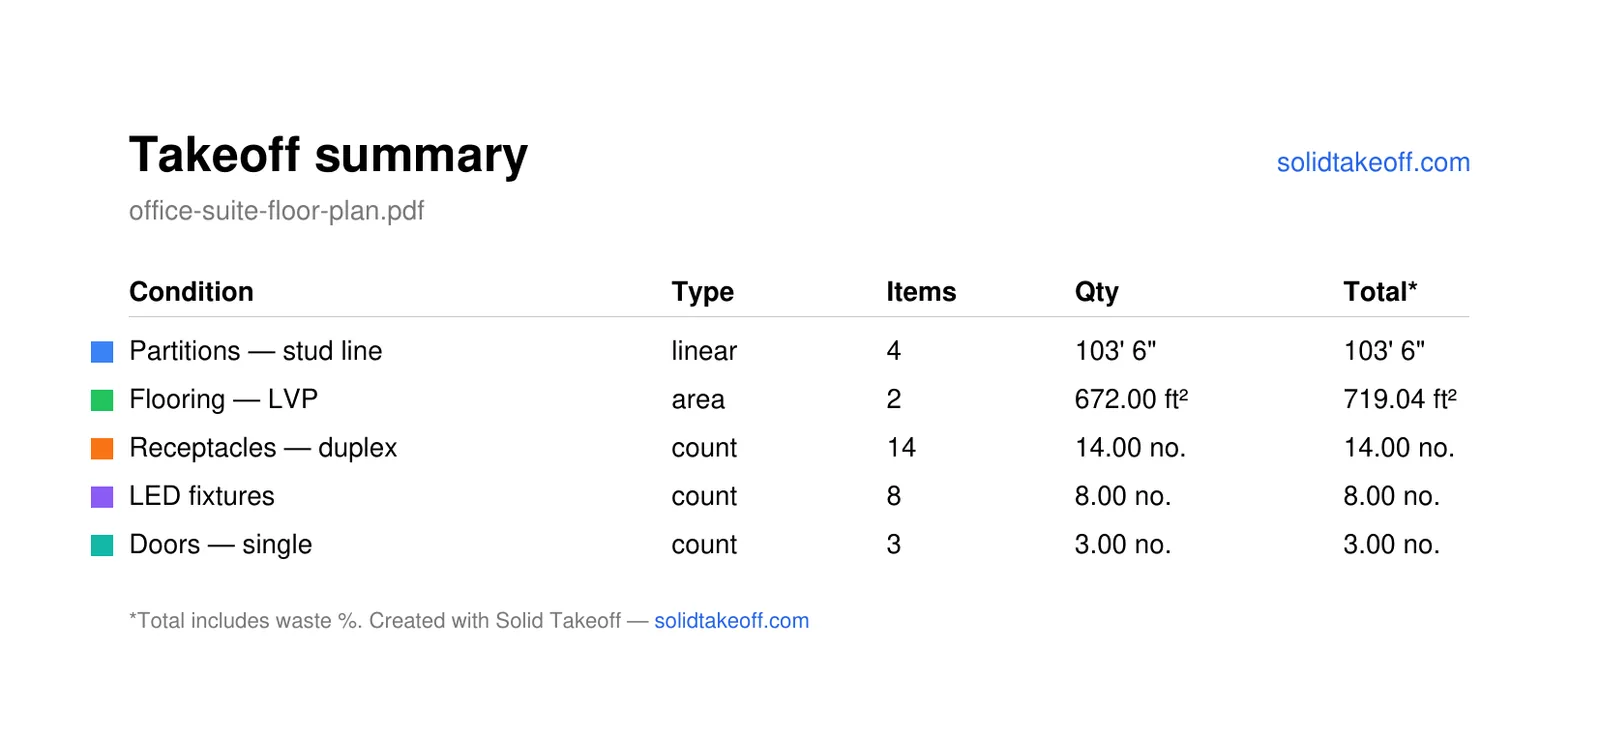
The Quantities CSV from the same sample plan holds these rows (the main columns shown):
| Condition | Type | Measurements | Quantity | Unit | Waste % | Total (incl. waste) |
|---|---|---|---|---|---|---|
| Partitions — stud line | linear | 4 | 103.50 | ft | 0 | 103.50 |
| Flooring — LVP | area | 2 | 672.00 | ft² | 7 | 719.04 |
| Receptacles — duplex | count | 14 | 14.00 | no. | 0 | 14.00 |
| LED fixtures | count | 8 | 8.00 | no. | 0 | 8.00 |
| Doors — single | count | 3 | 3.00 | no. | 0 | 3.00 |
Try your first PDF takeoff for free. Upload a drawing, check the scale and measure quantities in your browser. No credit card required to get started. Start free
How to Handle Drawing Revisions During a Construction Takeoff
Drawings change during bidding. A clean revision process keeps your quantities defensible:
- Log what you measured. Record the sheet number, revision letter and issue date the takeoff is based on.
- Read the revision clouds and the revision schedule first. They tell you which areas to re-check.
- Re-measure only what changed — but re-check the scale on every revised sheet, because a re-issued PDF can come out at a different size.
- Keep the old and new quantities side by side so the change is visible in your estimate, not buried.
- Note the revision on the export you send, so everyone knows which issue the numbers belong to.
SolidTakeoff doesn't compare drawing revisions automatically; you open the revised sheet and re-check the changed areas yourself. On the Solo and Team plans, version history keeps a timeline of each takeoff, so you can go back to an earlier point and mark the version you issued. For a fuller method, see how to compare construction drawing revisions.
Using Metric Drawings for Australian Construction Takeoffs
The same five steps work on metric plan sets used in Australia and other markets. Calibrate each sheet with a labelled metric dimension or a stated ratio such as 1:100 or 1:50, then measure lengths in metres and areas in square metres. Count doors, fixtures and fittings the same way you would on a US sheet.
Australian commercial tenders often refer to a bill of quantities (BOQ) prepared by a quantity surveyor or by the builder's estimating team. The takeoff still comes first: you measure the work, then organize descriptions, units and quantities into the schedule the tender expects. Export measured totals to CSV and finish the BOQ formatting in Excel or your estimating system — the takeoff tool supplies quantities, not a finished principal's BOQ.
Terminology shifts are small but useful. Wall linings are often called plasterboard rather than drywall; base trim may be skirting; and bids are commonly framed as tenders. Where a package needs cubic metres (concrete, excavation), calculate volume from the relevant measured lengths, areas and depths after export, rather than assuming a dedicated on-screen volume tool.
Keep US imperial examples for day-to-day practice if that is your market; switch the scale units when the PDF is metric. The checking habits — second-dimension verification, schedule reconciliation and waste as a transparent percentage — do not change.
Common Construction Takeoff Mistakes to Avoid
- Skipping scale verification — trusting a title-block ratio on a resized PDF.
- Mixing scales across pages — calibrating page 1 and assuming page 7 matches.
- Measuring the wrong revision — takeoffs that ignore a clouded change.
- Blending dissimilar materials — one "drywall" total that mixes thicknesses and ratings.
- Hiding waste inside raw numbers — makes audits and change orders painful.
- Ignoring schedules — counts that disagree with door or fixture schedules without a note.
- Forgetting both faces — drywall and paint often need two faces of the same partition.
- No second-dimension check — especially on scans and phone photos.
- Pricing inside the takeoff file — keep unit prices in the estimate spreadsheet unless your process explicitly combines them; mixing draft prices into raw quantities confuses later revisions.
- One giant condition for the whole job — break the work down far enough that a reviewer can spot an outlier without redoing the sheet.
Learning how to do a takeoff from blueprints becomes easier when you follow the same measurement and checking process on every project.
How to Do a Construction Takeoff Online for Free
You can complete a full digital construction takeoff in the browser with SolidTakeoff — open a PDF or image, detect or calibrate scale, measure linear/area/count into conditions with waste %, then export PDF and CSV.
Free construction takeoff software on SolidTakeoff means a real Free plan, not only a short trial:
| Plan | Price | What you get |
|---|---|---|
| Free | $0 | 1 active project; 3 new drawing uploads in total while on Free; 250 MB storage; all measurement tools, conditions and waste %; PDF exports carry a small SolidTakeoff footer; 1 user (no live collaboration) |
| Solo | $12.99/mo | Unlimited projects and uploads, 10 GB, clean exports (no footer), version history, 1 user |
| Team | $49.99/mo | 3 users included, then $16.99 per extra user; 50 GB of shared storage plus 15 GB per extra user; live multi-user collaboration; version history |
You can even open a PDF in the online editor and measure without an account; that work is saved in your browser only. New accounts also get a 14-day free trial of Team features with no card required. Upgrade when you need more projects, more uploads, clean exports or teammates — not to unlock basic measuring.
That makes SolidTakeoff practical free construction takeoff software for learning the workflow on a real job, then scaling when the pipeline grows.
Related Takeoff Guides by Trade
After you learn the end-to-end method, open the trade guide that matches the package you are pricing:
- Drywall takeoff from PDF drawings
- Flooring takeoff from PDF drawings
- Electrical takeoff from PDF drawings
- Plumbing takeoff from PDF drawings
- HVAC ductwork takeoff from PDF drawings
- Roofing takeoff from PDF drawings
- Painting takeoff from PDF drawings
- Concrete quantities from PDF drawings
For the full directory of takeoff articles and how-tos, browse the SolidTakeoff blog.
Construction Takeoff Questions
Can I do a construction takeoff without AutoCAD?
Yes. A PDF is enough. Browser-based PDF takeoff software measures lengths, areas and counts to scale without a CAD license. You do not need the native DWG for everyday quantity takeoff.
Can I take off from scanned plans or photos?
Yes, if you calibrate carefully. Ratio presets often fail on scans because the page is not true paper size. Draw over a known dimension, enter the real length, then verify a second dimension before measuring.
What is the difference between a takeoff and an estimate?
The takeoff measures quantities (LF, sq ft, counts). The estimate prices those quantities with labor, material rates, markups and contingency. Accurate takeoff first; pricing second.
Can I export a takeoff to Excel?
Yes. Export a CSV of condition totals — lengths, areas and counts — and open it in Excel. Pair that with an annotated PDF when reviewers need to see what was measured on the drawing. See how to export a takeoff to Excel.
How does a takeoff relate to a bill of quantities (BOQ)?
A takeoff is the measurement step. A BOQ is a structured schedule of measured work — descriptions, units and quantities — often prepared for tendering and variations. Export measured quantities to CSV, then use Excel or your estimating system to prepare the bill of quantities required for the tender.
Does this workflow work on Australian metric drawings?
Yes. Calibrate each sheet using a known metric dimension or scale ratio such as 1:100 or 1:50. Measure lengths in metres, areas in square metres and count individual items. Where a project requires cubic metres, calculate volume separately using the relevant measured dimensions and export the quantities for further estimating.
How do I learn how to do a construction takeoff faster?
Practice on one complete sheet: verify scale, measure one linear condition, one area condition and one count condition, export, then compare against a schedule. Repeat on the next sheet. Short, complete cycles beat incomplete mega-takeoffs.
Try your first PDF takeoff for free. Upload a drawing, check the scale and measure quantities in your browser. No credit card required to get started. Start free